Before you build anything, you need to understand the problem. Engineers don't start by building — they start by asking questions and learning from existing designs.
A
🎯 The Problem
You are designing a bridge using up to 100 popsicle sticks that must span at least 15 inches and hold at least 10 pounds. To succeed, you need to understand how bridges handle weight and why some designs are stronger than others.
What You Need to Do
Two tasks for Criterion A
01
Research Strong Bridge Designs
Explore the resources below and take notes on what you find. Focus on these four big ideas:
Bridge Shapes & Structures — Beam, arch, truss, and suspension bridges all distribute weight differently. Which type do you think will work best with popsicle sticks?
Why Triangles Matter — Triangles are one of the strongest shapes in engineering. They spread force and prevent bending. Look for triangles in strong bridge designs.
Forces on a Bridge — Bridges handle compression (pushing forces) and tension (pulling forces). How does a strong bridge balance both?
Real-World Examples — Look at the Golden Gate Bridge, Brooklyn Bridge, and Millau Viaduct. How does each one handle weight differently?
Bridge Types
Study these four main designs — which will YOU choose?
Beam BridgeSimplest type. A flat deck on supports. Weight pushes straight down into the piers.
Arch BridgeThe curve redirects weight outward into the ground. Great at handling compression.
Truss BridgeBuilt from triangles. Very strong for its weight — the best choice for popsicle sticks!
Suspension BridgeCables hold up the deck. Towers handle compression; cables handle tension.
Why Triangles?
The secret shape of strong structures
Triangle StabilityA triangle can't be pushed out of shape — its angles lock in place under force.
Compression vs TensionWeight squeezes the top of the deck (compression) and stretches the bottom (tension).
02
Sketch Two Real Bridges
Choose two famous real-world bridges and sketch them by hand. Each sketch should:
Show the overall shape of the bridge clearly
Include important structures (arches, beams, or trusses)
Be labeled with the bridge name and type
Include one sentence explaining why you think it's strong
A one-page cheat sheet covering everything above — save it or print it
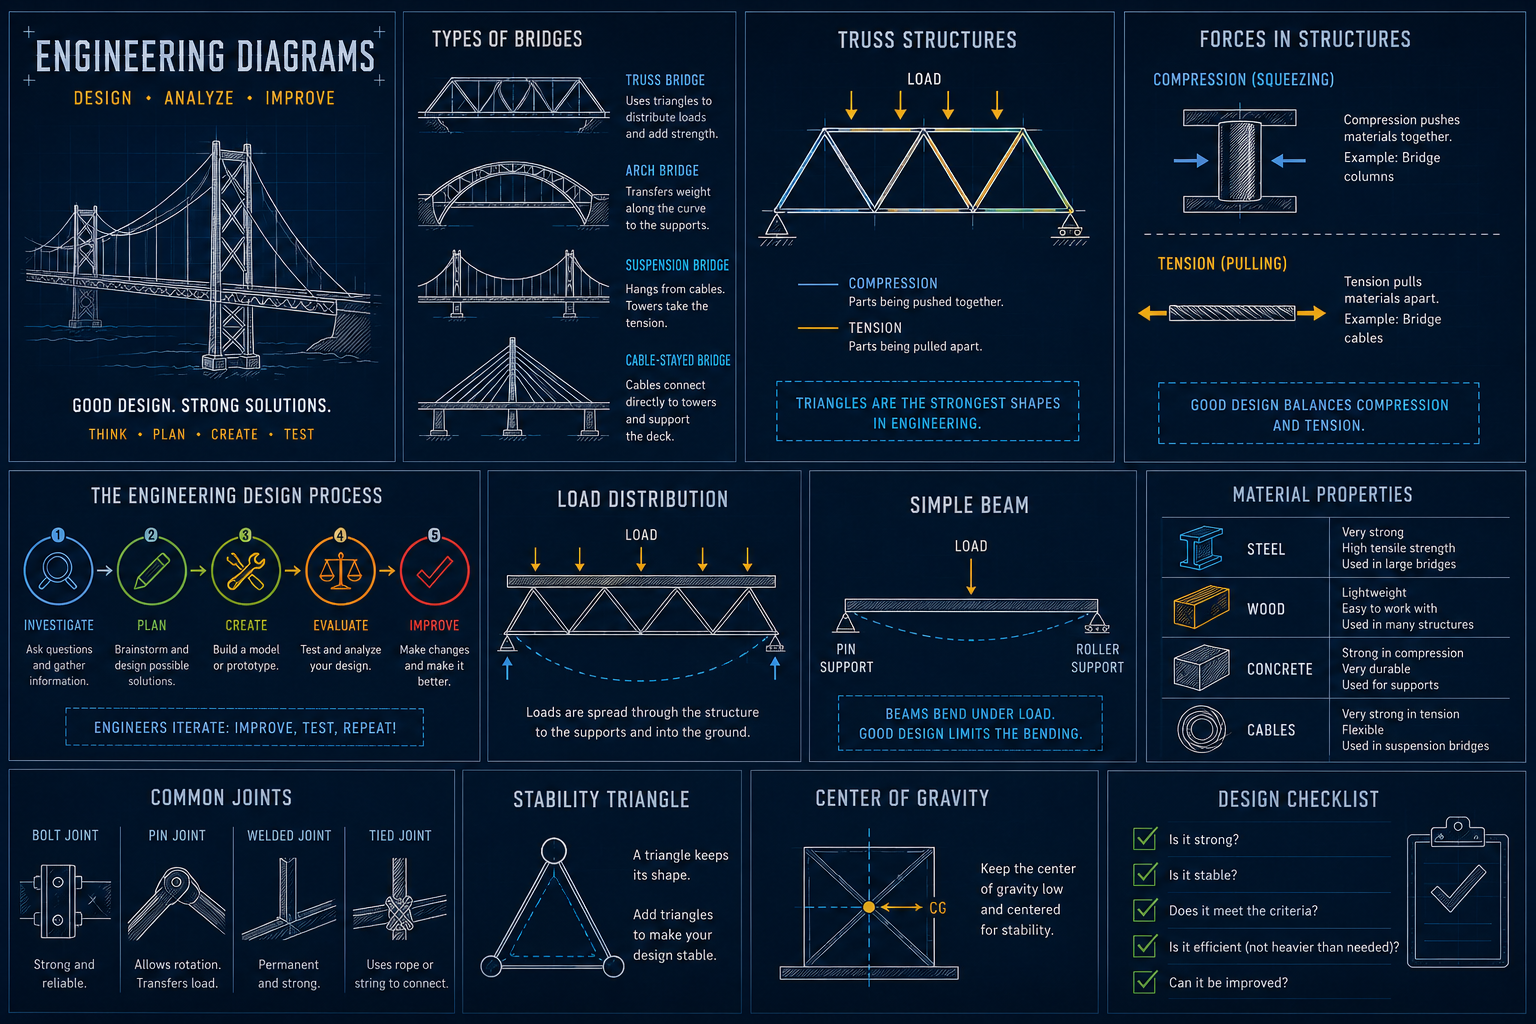
Engineering Diagrams — Design · Analyze · ImproveCovers bridge types, truss structures, compression & tension, the design process, load distribution, materials, joints, and a design checklist. Handy to keep open while you research and plan.
💡 Research Questions to Answer in Your Slideshow
1. How do shapes like triangles help make bridges more stable?
2. What design features make a bridge strong enough to hold weight?
3. How do different types of bridges (beam, arch, truss, suspension) handle weight differently?
4. Based on your research, which design will YOU use — and why?
📋 For Your Slideshow
Complete Slides 3 and 4 in your student slideshow:
① Use your research notes to answer the 4 questions above — write like you know how!
② Include TWO sketch drawings of two different famous bridges. Don't forget to title your sketches.
Slide 3 — Research AnswersSlide 4 — Bridge Sketches
Criterion B
PLAN YOUR BRIDGE
Engineers don't build right away. They plan first. A strong plan helps prevent mistakes and leads to a stronger final product.
B
🎯 Your Goal
Design a bridge using up to 100 popsicle sticks that spans at least 15 inches and holds at least 10 pounds. Your plan should show clearly how your bridge will stay strong and stable.
Example: Popsicle Stick Truss
Use this as inspiration for your own sketch
Side View — Truss StructureLabel the top chord, bottom chord, verticals, and diagonal braces in your own sketch.
Joint DetailWhere sticks meet is where bridges fail. Plan overlapping joints and use plenty of glue.
What You Need to Do
Three tasks for Criterion B
01
Choose a Bridge Design
Think about everything you learned in Criterion A and decide on your approach:
What type of bridge will you build? (beam, truss, arch, suspension, or hybrid?)
How will your design handle the weight?
Where will you deliberately use triangles for strength?
02
Create a Detailed Sketch
Draw your bridge design by hand. Your sketch must include:
The full shape of the bridge (front view)
A side view showing the structural depth
Labels for key parts: base, supports, trusses, joints
Marks showing where you'll add extra reinforcement
Your sketch doesn't need to be perfect — it just needs to clearly show your idea.
03
Write Step-by-Step Build Instructions
Before you start building, write out your plan like a recipe. This should include:
The order in which you'll assemble the bridge
Which parts you'll build first (foundation, sides, top, etc.)
How you'll attach pieces together at each joint
Any special techniques for making connections stronger
📐
Use Strong Shapes
Triangles distribute force better than squares or rectangles. Build them into your design on purpose.
⚖️
Stay Balanced
Symmetrical bridges distribute weight more evenly. What's on the left should mirror the right.
📍
Plan Your Joints
Bridges most often fail at connections. Think carefully about how each piece attaches to the next.
🎯
Think About Load
Where will the 10 pounds sit? Design the strongest part of your bridge to be right there.
📋 For Your Slideshow
Complete Slides 5 and 6 in your student slideshow:
① Your step-by-step build instructions (both partners contribute).
② Detailed sketches of your bridge design — front view, side view, and labeled parts.
Now it's time to turn your plan into a real bridge. Follow your design, make smart adjustments, and document every step of the way.
C
🎯 Your Goal
Build your bridge using up to 100 popsicle sticks, hot glue, and masking tape. Follow your design sketch as closely as possible, but make smart changes if something isn't working — and note what you changed and why.
The Three Build Stages
You'll photograph your bridge at each of these moments
BeginningLay out your base. Take a photo before you've built much — show your starting point.
MiddleSides and supports going up. Capture the structure before the bridge is fully closed.
FinishedComplete and decorated bridge before testing. Your best shot — make it look great!
Building Tips
Work smart, not just hard
01
Follow Your Plan
Use your Criterion B sketch as your guide. Build in the order you wrote out in your instructions. If you deviate from the plan, make a quick note of what changed and why — this is valuable data for your Evaluate section.
02
Work Carefully & Together
Use materials wisely — you only have 100 sticks
Focus on clean, strong connections at every joint
Let glue dry fully before adding weight or pressure
Work together — communicate with your partner
Be careful with the hot glue gun; take turns if needed
03
Document Your Progress
Take photos at three key stages of your build:
📸 Beginning — your starting structure and base laid out
📸 Middle — supports and sides being assembled
📸 Finished — your completed bridge before testing
04
Decorate! 🎨
No one wants to walk across a boring bridge. Use your markers to give your bridge some personality. Name it. Color it. Make it yours. A well-decorated bridge is a happy bridge.
🔧 If Things Aren't Going as Planned...
That's engineering! If a part breaks, a joint won't hold, or the design doesn't look like the sketch — don't panic. Adjust, adapt, and note what you changed. Problem-solving under constraints is exactly what this project is about.
📋 For Your Slideshow
Complete Slides 7 and 8 in your student slideshow:
① Photos of the three building stages (beginning, middle, finished).
② A final glamour shot of your decorated bridge, ready for testing!
Slide 7 — Build PhotosSlide 8 — Finished Bridge
Criterion D
TEST & EVALUATE
Engineers don't stop after building. They test, analyze, and think about how they could improve. Now it's your turn.
D
15in
Did it span?
10lbs
Did it hold?
100
Sticks Used?
How the Test Works
What you'll be watching for during the load test
The Load TestWeight is placed in the center. Watch for bending, cracking, or joint failure at the edges.
Common Failure PointsMost bridges fail mid-span (not enough depth) or at joints (not enough glue). Note where yours fails!
What to Do
Four parts to your evaluation
01
Test Your Bridge
Your bridge will be tested by adding weight. As it's being tested, observe carefully:
How much weight it holds before anything moves or breaks
Where it starts to bend, twist, or crack first
How stable the structure feels under increasing load
02
Record Your Results
Write down the facts from your test:
The maximum weight your bridge held
Whether it met the 10-pound goal (yes or no)
What happened during the test — describe it like a scientist
03
Analyze Your Design
Compare your original plan to what you actually built and how it performed:
What worked well in your design?
Which parts of the bridge were the strongest?
Which parts were the weakest — and why do you think that happened?
04
What Would You Improve?
Engineers are always improving. If you built it again:
What specific changes would you make to the design?
How would those changes make the bridge stronger?
What's the most important thing you learned from this whole experience?
💡 Didn't Hit 10 Pounds?
That's okay — and it's actually great data. A bridge that failed at 6 pounds taught you something a perfect bridge couldn't. Write honestly about what happened, why you think it happened, and what you'd do differently. That kind of reflection is exactly what Criterion D is looking for.
📋 For Your Slideshow
Complete Slides 9, 10, and 11 in your student slideshow:
① A video of your bridge being tested (film it!).
② A list of improvements — there's always room to grow.
③ A written reflection — at least one full paragraph in your own words.
Know the language of engineering. These terms will come up as you research, plan, build, and evaluate.
V
Engineering Terms
Vocabulary for the Bridge Challenge
Compression
A pushing or squeezing force. When weight presses down on a bridge, the top of the structure is often under compression.
Tension
A pulling or stretching force. The bottom of a bridge deck is often under tension when weight is placed on top.
Truss
A structure made of triangles joined together. Trusses are incredibly strong for their weight and are used in most bridge types.
Beam Bridge
The simplest type of bridge — a horizontal deck supported at both ends. Strength comes from the rigidity of the beam itself.
Arch Bridge
Uses a curved arch to redirect load outward and downward into supports at each end. Very efficient at handling compression.
Suspension Bridge
Uses cables hung from tall towers to support the deck. The cables carry tension while the towers carry compression.
Load
The weight or force that a structure must carry. In this challenge, your load is at least 10 pounds placed on your bridge.
Span
The distance a bridge crosses between its supports. Your bridge must span at least 15 inches.
Joint
The point where two pieces connect. Joints are often the weakest part of a structure — strong joints are essential!
Symmetry
When both sides of a design are mirror images. Symmetrical bridges tend to distribute weight more evenly and perform better.
Structural Integrity
How well a structure can withstand its intended load without breaking, bending, or collapsing.
Force Distribution
How a structure spreads out applied forces. A good bridge design moves force from the load to the supports efficiently.
Reference
RULES & MATERIALS
Engineers often work within strict constraints. Part of the challenge is using your limited resources wisely.
R
Allowed Materials
You may only use what is listed below
🪵
Popsicle Sticks
Max 100 sticks
🔥
Hot Glue
3–4 glue sticks
🎁
Masking Tape
1 roll
🖊️
Markers
For decoration only
⚠️ Important
You may NOT use any other materials unless your teacher specifically approves them. Part of being an engineer is working creatively within constraints — that's the challenge!
The Challenge Rules
Your bridge must meet all three requirements
📏
Span 15+ Inches
Your bridge must cross a gap of at least 15 inches from support to support.
⚖️
Hold 10+ Pounds
Your bridge must support at least 10 pounds of weight without collapsing.
🪵
Max 100 Sticks
You may use no more than 100 popsicle sticks total in your build.
🏆 Remember
A bridge that meets all three requirements AND is beautifully designed is always better than one that just barely passes. Aim high — your bridge could end up in the Hall of Fame!
Assessment Tool
IB DESIGN RUBRIC
Click a level for each criterion to calculate your score. Each criterion is worth 1–8 marks. Total is out of 32.
★
Criterion A
—
/ 8
Criterion B
—
/ 8
Criterion C
—
/ 8
Criterion D
—
/ 8
Total
—
/ 32
A
Criterion A — Investigate
Research · problem definition · analysis
— / 8
▾
Assessed via student slideshow — Slides 3 & 4
B
Criterion B — Plan
Design sketches · labeled parts · build instructions
— / 8
▾
Assessed via student slideshow — Slides 5 & 6
C
Criterion C — Create
Construction · documentation · problem-solving
— / 8
▾
Assessed via student slideshow — Slides 7 & 8
D
Criterion D — Evaluate
Testing · analysis · reflection · improvements
— / 8
▾
Assessed via student slideshow — Slides 9, 10 & 11
Grade boundary reference
1–8
Grade 1–2
9–14
Grade 3–4
15–22
Grade 5–6
23–32
Grade 7
Interactive Tool
BRIDGE LAB
Choose a bridge type, build each section with your own layout, material, and color, then load it with weight and find exactly how much it can hold before it breaks.
🌉
🎮 How To Use The Bridge Lab
1. Pick a bridge type — it sets your starting shape and base strength.
2. For each of the 3 sections, choose a layout, a material, and a color.
3. Watch your Estimated Strength update live as you build.
4. Add weight until you find its breaking point — or prove it can handle more than the real 10-pound requirement!
1. Choose Your Bridge Type
Sets your bridge's starting shape and base strength
2. Build Your Sections
Pick a layout, material, and color for each section of your bridge
Estimated Strength
0.0lbs
Real-World Target
10lbs
Current Test Load
0lbs
3. Preview & Test
Your bridge updates live as you build it above — add weight to test it
💡 Why This Matters
Triangles (Truss) and curves (Arch) redirect force more efficiently than a Solid beam or an X-Brace. Sturdier materials add strength but aren't always realistic — the real challenge only allows popsicle sticks. Testing more than once matters: real bridges, and this simulation, have some natural variability from build to build.